| M-11
Field Strip |
This is page 2 of the M-11 Field
Strip tutorial. If you would like to go to the previous
page click on the link below.
Click
here to return to previous page of this tutorial
|
| Steps
4 through 6 |
| Step
4 |
| |
|
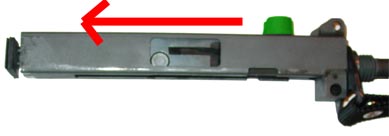
| With
the upper and lower separated we can now remove the bolt
from the upper receiver. To
do this grasp the charging knob, colored in green, and
pull it all the way back until it stops (red arrow).
|
| Step
5 |
| |
|
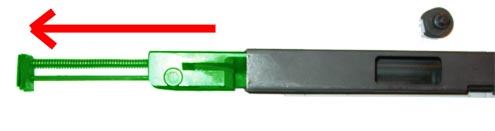
| Once
the charging knob, colored in green, reaches then end
of the upper receiver you can pull it up to remove it
from the bolt (red arrow). Since the charging knob is
used to hold the bolt inside the upper receiver its removal
will allow the bolt to be extracted from the upper receiver. |
| Step
6 |
| |
|
| Now
that the charging knob has been removed, you should be
able to pull the bolt assembly, marked in green, out of
the upper receiver (red arrow) through the rear hole. |
| "Intermission"
|
|
| At
this point the gun is field stripped (yes I know the barrel
has been cut off, I accidentally cut it out with a image
editor) and will allow you plenty of access to clean and
maintain your gun. Further disassembly should not be necessary
for regular maintenance.
If
you wish to disassemble the subassemblies like the bolt
or fire control group please refer to the tutorial section
on the menu to the left.
If you want to learn
how to reassemble your gun from this stage continue
with this tutorial by going to the next page.
|
| Click
here to go to page 3 of this tutorial |
|