| M-11
Fire Control Group (FCG) Disassembly |
In this tutorial I used a M-11/NINE,
the general procedure is similar for all full auto M-11s including the .380 version. M-10s are similar, but slightly different, especially in how the trigger spring sits... you can see videos of MAC 10 disassembly & reassembly by clicking HERE for one version, and
HERE for another.
To do basic disassembly of the FCG you will
need a small screw driver; but if you want to fully disassemble it including the safety subassembly, you'll also need a hammer and a pin punch set.
If you don't know how to take apart your gun and separate the upper from the frame,
please refer to the M-11 Field Strip tutorial.
MAKE SURE YOUR GUN IS UNLOADED BEFORE DOING
THIS!!!!!
|
| Steps
1 through 3 |
| Step
1 |
| |
A.
FCG Retention Pin
B. Trigger Axis Pin
C. Trigger Spring
D. Disconnector
E. Trip
F. Trigger
G. Safety Slide
H. Sear
I. Selector Pin
|
|
| First
get familiar with the color-coded chart I have made above.
Take note of the names of the parts and their locations.
If you get confused, referring to this chart may help.
|
| Step
2 |
| |
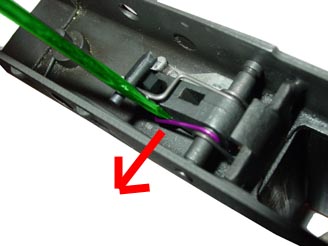
|
Lets
start by removing the selector axis pin, marked in blue.
First use a screwdriver to lift up the FCG retaining
wire, marked in purple, so that the selector switch
can be rotated to the 12 o’clock position. |
 |
The
selector switch at the 12 o’clock position. |
| |

|
Once
you have it rotated, you can push it out if you continue
to hold up the retention wire. If the pin gets stuck
rotate it till it moves again.
|
With the selector
pin removed, you should have been able to pull out the
following parts. A.
Selector Switch Pin
B. Trip
C. Sear
D. Sear Spring
|
|
| Step
3 |
|
Now
lets prepare the trigger for removal.
Before removing the trigger
we must release the spring tension placed upon it.
Take your screwdriver
and push down on the left spring arm, marked in purple,
and pull it away from the bottom of the trigger frame.
You must push it far enough down that the hook clears
the little pocket under the trigger frame.
|
|
If you
did it correctly then the left spring arm, colored purple,
should be free as shown in the picture to the left. |
| Now
place a finger on top of both spring arms and press down.
While pressing down push the disconnector, marked in green,
forward so that it unlatches from the right spring arm,
marked in purple. |
 |
|
If you
did it correctly then the right spring arm should be free
as shown in the picture to the left. |
| Click
here to go to page 2 of this tutorial |
|