| M-11
Bolt Disassembly |
This is page 2 of the M-11 Bolt
Disassembly tutorial. If you would like to go to the previous
page click on the link below.
Click
here to return to previous page of this tutorial
|
| Steps
4 through 5 |
| Step
4 |
| |
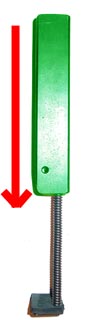
| Place
the recoil plate against a flat surface and push the bolt,
marked in green, towards the plate. |
|
 |
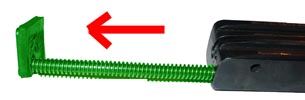
You
will notice that as the assembly compresses, the front
end of the recoil rod will become visible near the front
of the bolt. The front end of the recoil rod has a roll
pin, marked in green, going through it. This roll pin
must be knocked out for the recoil rod to be removed.
While
compressing the bolt assembly, grab your hammer and gently
knock this pin out. You may need a 1/16" punch to do this.
This can be tricky to do without help. I find placing
the recoil plate against the base of the wall and by
using my knee to hold the bolt back allows me to use
my hands freely to remove the roll pin. |
Now
that the roll pin is removed, just pull the recoil rod
and associated parts, marked in green, out of the bolt.
WATCH OUT, the parts are under spring pressure &
they can fly out uncontrollably if you don’t keep
a hand on them.
|
|
| At
this point the spring, recoil plate, and buffer can be
slid off the recoil rod. Sorry no picture. |
NOTE: If you
only need to replace the buffer pad, you do NOT need to disassemble the bolt to
do that. Cut off the old pad if necessary. If your new pad has a hole for the
recoil rod/spring to slide through, just cut a slit in the pad from the edge into
the hole, and wrap it onto the spring. Some new pads actually don't use a hole, but have the entire
corner of the pad cut out and you can cut your "hole" type corner into looking like that if you don't want to just slit it. Either style is acceptable... see below.

|
|
Step 5 |
| |
|
To remove
the extractor you will need a punch pin and a hammer.
Keep in mind that the extractor is also under spring pressure
so it could go flying if you don’t hold onto it.
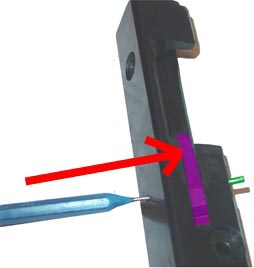
Take
a look at your bolt. You will notice that on the top
and bottom there is a roll pin, marked in green, which
is at a slight angle. This roll pin holds the extractor
in place.
|
| Place
your pin punch into the hole at the top of the bolt and
begin gently tapping on it with your hammer. You will
notice the roll pin protruding through the bottom hole
as you do this. When
the pin looks like its about 2/3 of the way out place
your thumb on top of the extractor, marked in purple,
to hold it in place so it doesn’t fly of. Once
the pin has been removed the extractor can be removed.
Be careful not to lose the small spring that is under
it.
|
|
| "Intermission"
|
| |
| We
have completely disassembled the bolt assembly. Most people
never completely take apart their bolt assembly because
it is usually unnecessary. At this stage it is a good
idea to clean the bolt in places that cannot be reached
under normal circumstances, such as, under the extractor.
If you wish to learn
how to put it back together continue with this tutorial.
|
| Click
here to go to page 3 of this tutorial |
|